A session is the time between which the user logs in and logs out. A user is said to be active in a session.
A session variable persist only within the active session. It receives a value when a user establishes the session.
Types of Session Variable:
1) System
2) Non-system

1) System session variable
- These are predefined variables provided by OBIEE.
- These variables are used by Oracle BI server for specific purpose such as Authenticating user.
- Following is the list of those pre-defined variables:
- USER
- DISPLAY NAME
- GROUP
- Create a sample report with Year and revenue.
- Edit formula for Year. From the bottom select variables -->session -->Type in USER-->ok.
- This will make VALUEOF(NQ_SESSION.USER) as shown below:

- Here, NQ_SESSION refers to the current active session.
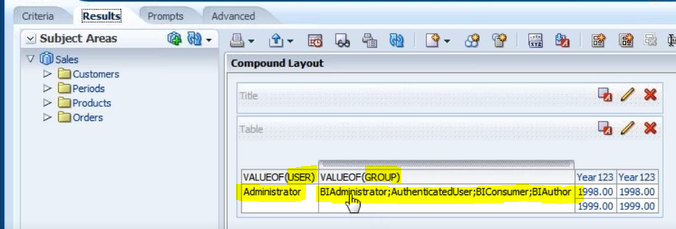
- Now go to results tab we will see the user ADMINISTRATOR displayed in Year column as result of VALUEOF(NQ_SESSION.USER) as shown below:

Similarly, the DISPLAY NAME, GROUP, PERMISSIONS system variable can be used:
2) Non-system session variables
- These are application specific customized variables which are created by Implementation team/Developers for specific purposes.
- These can be used for data security in case we restrict the data for a particular user. For example, if a user is from East region then he should be able to see only East region's data and not West and Central.
- Like Dynamic repository variables, Non-system session variables also require Initialization block.
- Suppose, we have 2 Customers in the CUSTOMER table
- Amerigo user who belongs to East region
- Compound user who belongs to West region
- Let us create these users in OBIEE using console. For now they are just values in the CUSTOMER table in column "Name". So let us create a user Amerigo.
- Login to http://localhost:7001/console/login using Administrator privileges.
- On left hand side, Under Domain structure-->Security realms -->myrealms-->go to Users and Groups tab-->Users sub-tab -->New-->
- Name: Amerigo
- Password: Amerigo
- Confirm Password: Amerigo
- Similarly, create another user called Compound. Keep in mind that these names should be exactly similar to what we have in Customer table since later while fetching the data from CUSTOMERS table the case must match.
- We are able to create users in OBIEE because of (LDAP) Lightweight Direct Access Protocol. It is third party tool integrated with OBIEE console and is useful to verify the security related objects.
- Now we need to create a Group for the user say Customer group since we are creating logins for 2 customers. Go to GROUP sub-tab-->New-->
- Name: BICustomers
- Description: group of customer
- Provider: Default
- Now we need to assign this Group to both Amerigo and Compound User. To do this, go to the USERS sub-tab-->click on Amerigo-->go to groups sub-tab--->select BICustomers from the list of groups-->Save. Similarly, assign BICustomers to Compound user as well as shown below:

- In next step , we will create an application role through EM Enterprise Manager. Then we will assign the BICustomers Group to this application role. To create this application role, we need to perform following steps.
- Go to web browser and login to http://localhost:7001/em/login using Administrator privilege --> expand Business Intelligence and select core applications as shown below:

- Go to Security tab-->under Application Policies and Roles , select Configure & Manage Application Roles-->create -->
- Role Name: BICustomer
- Display name:BICustomer
- Description:
- Now under Members section, click on Add green plus sign.-->in search section type in BICustomers and hit enter.-->In the list BICustomers group will appear. ---> select BICustomers -->ok. This is how we create new application role and assign a user group to it.
- Next we need to synchronize the application role and group created in Enterprise Manager in to the repository. This is to inform the Repository that 2 new users, 1 group and 1 application role was created in EM.
- Open the repository in online mode-->Manage-->Identity-->Action -->synchronize Application Roles . Once we do this, we can now see BICustomer under Application roles tab as shown below:

- Now, any new user getting created in Console needs to access data from the database for which they require dedicated connection pool in Repository's Physical layer. To do this, go to physical layer--> Orcl-->new object--> Connection Pool--> fill in details as follows:

- Now, we need to create Initialization Block and assign the value to a non-system session variable. To do this, go to Manage--> Variables-->Action--->new-->Session--->Variable -->fill in as shown below:

- Now, in the Initialization Block section -->New...--> fill in as shpown below
- Name:IB_USER_REGION
- Edit data source: SELECT REGION FROM CUSTOMERS WHERE NAME=':USER' Above query fetches the region name where the current user belongs.
- Connection pool: IB_SESSION (since we created the dedicated connection pool for new users)
- ok -->ok.

- Check in changes and save.
- After this, we need to add data filter to restrict the data. go to manage--> identity -->on left hand side select BI Repository--> Application roles -->BICustomer --> check out --> data filter tab-->add --> click on Sales and hit select button --> a new line will be added--> select the newly created line--> edit expression button beside Add button--> assign filter using V_USER_REGION variable as shown below:

By doing this, we are filtering the data for BICustomers. So whenever a user belonging to BICustomer Application role logs in, be it Amerigo or Compound, it will have a data filter on the region field. This region will get its value from Non-system session variable V_USER_REGION. this variable gets its value from IB_USER_REGION initialization block.
- Check in changes and save.
- At this point, we have completed all changes in Repository.
- Now its time to login into analytics using Administrator user and reload server metadata. Create a report using Region, district, revenue column, go to results tab and we will see all the regions data since the administrator is allowed to view the data from all the regions. Now save this report as "Data Security Report" under shared folder in web catalog. Sign out.
- Now login using Amerigo user (Please remember that we must enter username exactly as in the table Customers, it is case sensitive, if we miss the case, we may be able to log in but the data in the report will not be displayed. If you want the username case-insensitive then just add upper on both sides of the select query written in IB_USER_REGION like "select region from customers where upper(name)= upper(':USER') ). Open the Saved "Data Security Report" . Here, Amerigo user can see only East region data since it belongs to only east region. Similarly, if we login using Compound data we will see West region data only.
- This is how we achieve data security using Non-system session variables by providing limited access to the users.
No comments:
Post a Comment